Safety Tips
River and Stream Crossings
River and stream crossings are one of the most dangerous challenges on the Appalachian Trail (A.T.). Hikers have died in stream crossings along the Trail during major rainstorms. When in doubt about the safety of a river crossing on the A.T., wait for the water to go down or turn around – it is not worth the risk. Pack extra food and supplies so you can be prepared to turn around or wait if necessary.
If a section of the Appalachian Trail is closed or presents a serious safety hazard, hikers may take a designated alternate route or skip those sections entirely and still be eligible to receive 2,000-miler status.
 Do not attempt to wade or swim across Maine’s Kennebec River. Dam releases upstream may cause sudden and rapid changes in water depth and current. Two hikers are known to have died attempting to ford the river. The official route of the Trail across the Kennebec is the ferry service for A.T. hikers, provided during peak hiking season.
2025 Kennebec River Ferry Schedule
May 23 through June 30: 9:00 a.m. – 11 a.m.
July 1 through September 30: 9:00 a.m. – 2:00 p.m.
- Do not attempt to ford the river. Please use the ferry service; it is free.
- Arrive early in provided time period each day to ensure a safe and enjoyable crossing.
- If, in the judgment of the ferry operator, river or weather conditions make the crossing dangerous, the service will be paused until conditions improve.
- Hikers are required to complete and sign a release form, wear a life jacket, and follow instructions.
- Groups of six or more, please call or email the ferry operator to schedule a crossing.
- Ferry operator: Maine Guide, LLC; (207) 858-3627; gcaruso92@icloud.com

On This Page:
- Learn how to plan ahead and prepare to hike sections of the A.T. with unbridged stream crossings.
- Learn when a stream or river is too dangerous to cross.
- Learn how to prepare for a crossing.
- Learn how to safely cross a river or stream.
- Learn what to do if you are swept away.
- Discover resources to learn more about river crossing safety.
There are sections of the A.T. that have unbridged river and stream crossings, particularly New Hampshire and Maine, that can become impassable after major storms and during spring snowmelt. Elsewhere on the A.T., even a small creek may become dangerous after exceptionally heavy rains or snowmelt. During and for a few days after storm events, it may be best to wait until water levels drop or backtrack to a road to get around a flooded area.
Bridges may be damaged or destroyed by storms and floods, resulting in unanticipated difficulties for hikers. Seek alternate routes if in doubt. Check-in with the ATC visitor centers, check our Trail Updates page, or contact us to get up-to-date information on Trail conditions. Overnight hikers can also register on ATCamp to receive urgent Trail alerts about high water. Other platforms with crowd-sourced information such as FarOut and AllTrails may also have updated condition reports from users
Most importantly: do not ford a stream when it looks too dangerous.
How to Prepare for Sections of the A.T. with Unbridged Stream Crossings
It is important to both mentally and physically prepare for sections of the Trail that have unbridged crossings. Remember that conditions can change on the A.T. at any time – always have the 10 Essentials and remain flexible.
Mental preparation is just as important as physical preparation:
- Remain flexible with your plans and give yourself a day or two of buffer time at the end of your hike. Avoid buying plane or train tickets or making unchangeable plans (weddings, vacations, etc.) for the day after you plan to end your hike and budget to give yourself extra time in case you have to wait out high water or turn around.
- Mentally prepare for the possibility of having to turn around and create a back-up plan. This can be extremely hard for A.T. hikers, especially thru-hikers nearing the end of their journey. Taking a moment before you leave town to think through what you’ll do if you must turn around can make it easier to do so if needed.
- Remember that no destination is worth your life. The A.T. will be there on a drier day when you can try again. Katahdin will still be waiting for you to summit.
Physical preparation gives you the ability to make safe choices:
- Learn how to assess if a river is safe to cross and practice safe crossing techniques. Read on for more information and visit the links at the bottom of the page to learn more.
- Pack extra food and supplies. This way you have the flexibility to turn around or wait for water to recede.
- Add a buffer or emergency fund to your hike budget so you can afford to stay in town an extra day or two if needed, can afford a shuttle around dangerous crossings, etc.
- Study a map of the area before leaving and always pack a map and compass. Paper maps will show a larger area around the Trail than most apps so you can see if there are public road walks or side trail alternatives to unbridged crossings. Carrying a map and compass is critical if you need to seek alternative crossing locations to the white blazed route.
- Keep in mind that the Trail in parts of Maine, particularly the 100 Mile Wilderness, is surrounded by private land and is bisected by private logging roads. Do not wander onto private land or roads that are closed to the public, and only take designated alternatives (these will be signed and/or blazed).
- Always check the weather before leaving town. Be prepared for the consequences of severe weather including high water, temperature changes, blowdowns, etc. Consider postponing your hike if severe weather is forecast.
- Contact the ATC or stop in at one of our visitor centers for up-to-date information on Trail conditions.
Most of the A.T.’s major unbridged river and stream crossings are in New Hampshire and Maine. There are a few unbridged crossings in other sections that can be dangerous during high water events. Any stream crossing can become dangerous during severe weather events – even bridged crossings.
When Is a Stream Too Dangerous to Cross?
No matter your level of experience, there are times when stream crossings are too dangerous to cross. When in doubt, turn around or wait for water levels to recede. Five things to watch for that indicate a river is too dangerous to ford:
(1) When the water is flowing faster than you can walk. Throw a stick into the water and see how rapidly the water carries it away. If you cannot walk as fast as it is moving, then it is not safe to cross.
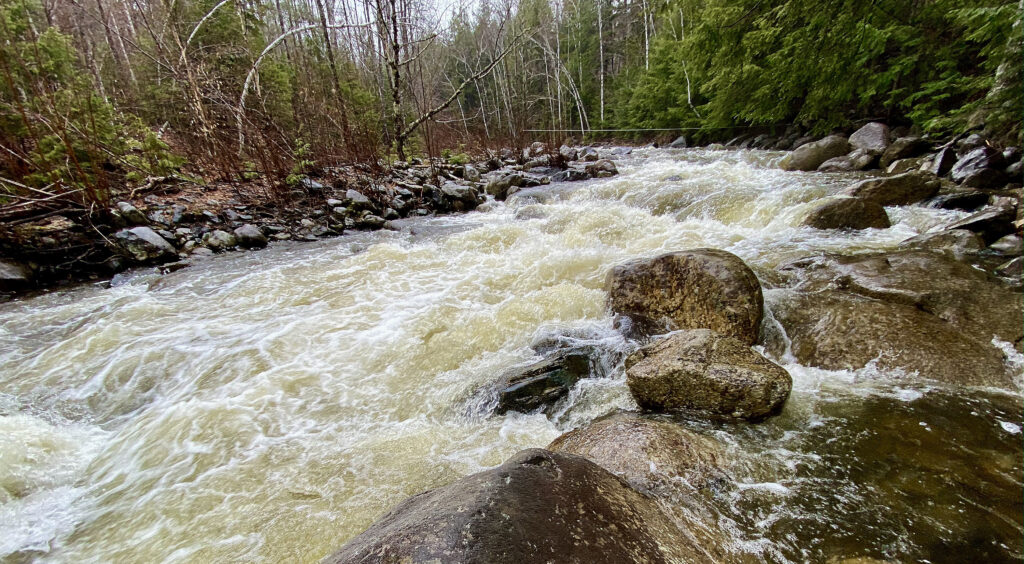
Long Pond Stream during heavy rainstorms in 2023. The water is certainly flowing faster than a person could walk. Photo by Roger Merchant.
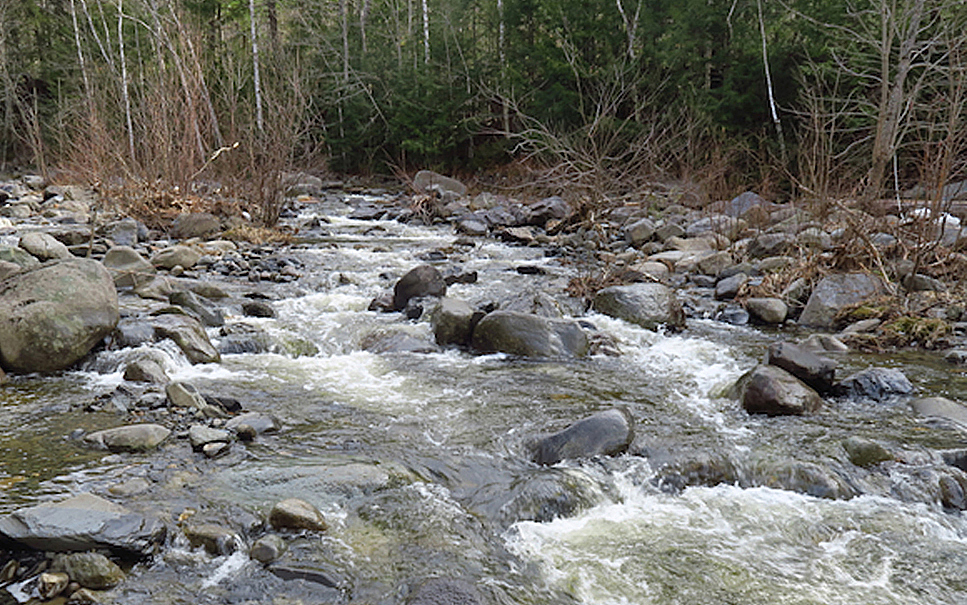
And Long Pond Stream during normal summer water levels. Note the slower eddies of water between rocks, the clear water, and small islands of rocks and shrubs. Photo by Roger Merchant.
(2) When the water depth is higher than thigh height. Even a moderate current can knock someone off their feet if the water is high enough. High water can also be an indicator of a recent storm, snowmelt, etc., meaning that the crossing is especially dangerous.
(3) When a river is in flood stage. Look for muddy, murky water that you cannot see through; surging, churning water; and hazards in the water such as branches and other debris being carried downstream. Shoreline plants and tree trunks may also be submerged that are otherwise not during normal water levels.

A river crossing clearly in flood stage. Note the churning, murky water, flooded opposite bank, and multiple hazards around and including the bridge. Neither fording nor using the bridge was safe on this day. Photo by Jean Violette.
(4) When you can hear rocks being moved by the water. This indicates an abnormally powerful current and can also be an indicator that a river is in flood stage.
(5) When there are hazards downstream such as rapids, trees or branches stuck in the river, or a waterfall, bridge, or dam.
Before Crossing
(1) Scout out the best location to cross and don’t assume that the blazed line of sight to the other bank is the path you should follow.
Water levels and currents are dynamic, so a good crossing point on one day may not be safe on another. Just because the blazed crossing route was safe on the day it was laid out does not mean it will be safe during high water.
Do:
- Cross where the water is moving slowly, even if it is deeper than where the water is moving swiftly.
- Cross at a straight section between bends. If you lose your footing, the current is likely to carry you to the bank on the outside of the bend.
- Cross where there is an island or sand bar in the middle. The current may be more manageable here and gives you a rest point partway through the crossing.
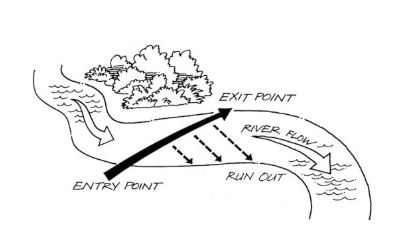
River crossing diagram courtesy of the Mountain Safety Council of New Zealand. “Run Out” is an area downstream of the planned crossing route that you can use as a bailout or turnaround point if needed.
Avoid:
- Crossing at points where the width of the stream is narrow. The power of the current will be strongest here and could sweep you off your feet.
- Crossing where there are “strainers” or other hazards at your planned exit point or downstream. Strainers are low-hanging branches or blowdowns that could make getting out of the water harder or trap you under water. Strainers can also sometimes indicate deep water cutting into the bank. Other hazards include rapids, trees or branches stuck in the river, or a waterfall, bridge, or dam.

Check for rapids near a crossing. Photo by James Timothy Peters.
(2) Prepare yourself and your group members for the crossing.
- Repack your pack in waterproof plastic bags or stuff sacks to enhance the pack’s buoyancy. If necessary, you may be able to use it as an aid for swimming.
- Unbuckle the hip and chest straps on your backpack so you can shed it quickly if you lose your footing and get swept downstream.
- Change out of loose-fitting clothing and long pants. They can drag you down in the water and create more resistance to the current. Shorts or underwear are best.
- Keep your shoes on. Your hiking shoes will give you the best protection and balance while crossing. Resist the temptation to try and keep shoes dry by changing into camp sandals. Never cross barefoot – there could be sharp rocks, old fishing lures, broken glass, and other hazards in the water.
- Take time to think through an emergency plan. If the worst case happens and you or a group member are swept off your feet, think about what you’ll do. If you’ve scouted out the best crossing location, you should have a good run-out point. Also ask yourself:
- How cold is the water and ambient air temperature? Do I risk hypothermia if I get wet?
- How remote am I? Can I make it safely back to civilization if I lose my gear or end up downstream?

Crossing with a partner or as a group is safer than crossing alone.
Solo hikers should wait to attempt major crossings until other hikers arrive. Tramilies (trail families) should plan to cross rivers and streams together.
The strongest person should be positioned in front/upstream to help break the current. Group members that are smaller/not as physically strong should be positioned in the middle, with another strong member placed furthest downstream. The Pacific Crest Trail Association (PCTA) has good examples of group crossing techniques depending on the size of your group, as well as some more helpful information on river crossing safety.
When Crossing
Remember, if you have doubts as to whether a river is safe to cross, don’t cross. Turn around, wait for the water to recede, or use a designated alternative route if one exists.
- Remember to keep your shoes on to protect your feet and give you the best traction while crossing. Wet shoes are better than an injured foot and far better than losing your balance and being swept away.
- Use trekking poles or a stout walking stick. This gives you three or four points of contact with the ground as opposed to only two. Keep in mind that whether you use one or two poles while crossing depends on the conditions (for example, you may need two hands to control one pole in strong currents). Take a few steps into the river to test what will work best for you at that crossing, then turn around and adjust as needed.
- You can also use your poles/walking stick to test the depth of the water ahead of you or before you step into the water.
- Cross facing upstream, lean into the current, and move one foot at a time. In fast-moving water, move downstream at a but face upstream. Shuffle-step sideways, keeping both feet, or one foot and your pole, in contact with the stream or river bottom at all times. If you lift your feet to move, make sure to firmly plant each foot before moving.
- Be cautious about using any ropes suspended above the stream. These are not official installations and are often left by well-intentioned hikers with varying levels of skill in choosing placement and tying knots. Do not tie yourself to these ropes, other hikers, trees, or rocks – this can drown you if you lose your footing.
- Keep your eyes on the prize. While you want to be aware of where you place your feet, looking down at the current can be disorienting. Look ahead for the best route and concentrate on your goal, but don’t rush. Try the psychological trick of imagining yourself safely reaching the opposite riverbank. It works!

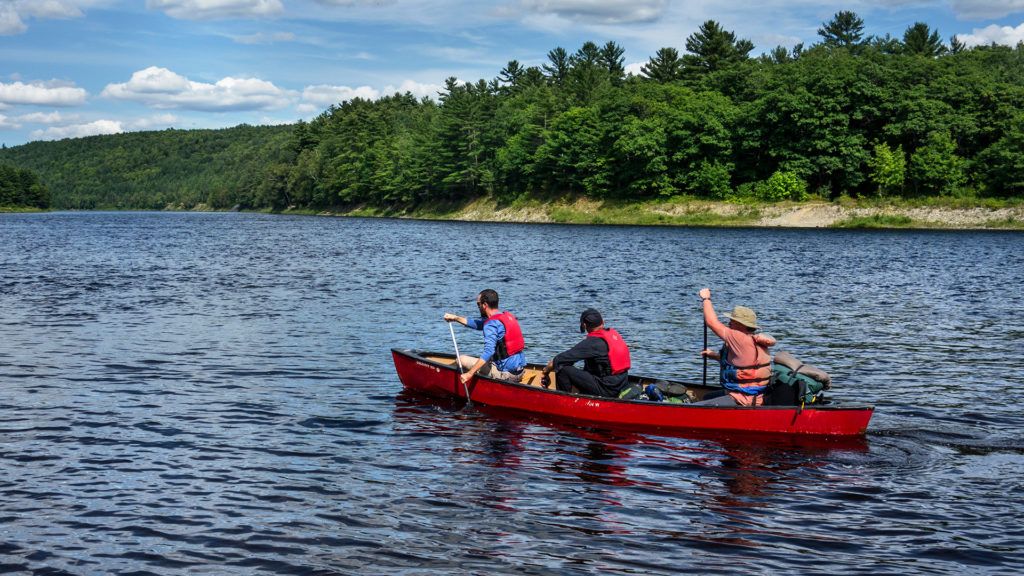
A good crossing point on the Pleasant River. Note the shallow water that is clear and slow-moving, and that this hiker has unbuckled their pack and is using trekking poles for balance. If the water was deeper or swifter, it may have been appropriate for this hiker to team up with the hikers on the far shore to do a group crossing. It may have also been appropriate for the hiker to face upstream and shuffle across. Photo by John Bilbrey.
If You Are Swept Off Your Feet
- If your pack is dragging you down or gets caught on something, ditch it. Saving your gear is not worth your life.
- Point your feet downstream and float on your back. This will help you see where you’re going and help protect your face and head from hazards.
- Do not put your feet down until you are in shallow, calm water. Foot entrapment (getting your foot stuck on a rock or log underwater) is one of the most dangerous things that can happen during a failed river crossing because the current can trap you underwater.
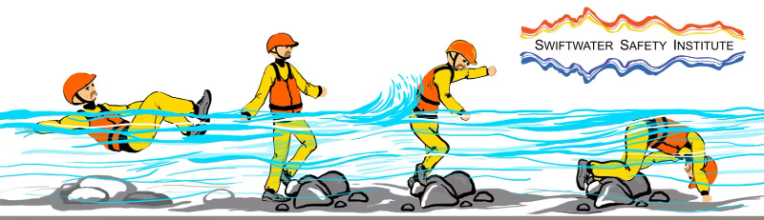
An illustration of foot entrapment. Diagram by Scott Solle, courtesy of the Swiftwater Safety Institute.
- Take the path of least resistance. Do not attempt to continue swimming toward the far shore. Float or swim quickly toward the nearest shoreline and get out there.
- Change out of wet clothes and consider ending your day early. Getting submerged in a cold stream can cause hypothermia to set in, so it’s important to get dry and warm as soon as possible. Self-rescuing is also hard work – if you are exhausted, find a place to camp and rest.
- If you or someone else is seriously injured in a crossing, call 911. You may have to backtrack or send someone else back in order to find cell phone service.
- Once you are safe and able, submit an incident report. It is extremely helpful for the ATC and agency partners to track stream incidents and close calls. Incident reports do not trigger an emergency response. If you need emergency help, call 911.
Learn More
Learning how to assess and safely cross rivers and streams before you need to use those skills on the Trail is critical. Practice in a safe location and consider taking a swift water safety course. Click on the hyperlinks below to learn more.
The Pacific Crest Trail Association has a thorough overview of river crossing safety for backpackers.
The National Park Service maintains a Swift Water Rescue Manual with information on prevention, river hazards, and defensive swimming techniques.
The Appalachian Mountain Club, an A.T. maintaining Club, occasionally offers swiftwater rescue skills courses (use search keyword “swiftwater when searching for courses).
The Mountain Safety Council of New Zealand has in-depth river crossing information as well as an interactive course. Note that some aspects of river crossings in New Zealand do not apply to sections of the A.T., especially regarding alternative bridged crossings.
Some information on this page was adapted from Navigation and Hiking Tips by George G. Spearing and information from both the Pacific Crest Trail Association and the Mountain Safety Council of New Zealand.